


What's a lunge and why does it matter? We'll explain that and more in this lunge exercises for beginner post.
See, lunges train one leg at a time so that forces each separate hip, knee and ankle on each leg to stabilize totally independently from the other leg. And that means it also helps correct imbalances on the right and left sides that can otherwise lead to pain or injury.
Because lunges require a long stride, it opens up our hip flexors and utilises our glutes, quads and hamstrings, which are key for maintaining that ability for us to walk well and climb stairs and do all the things that we want to do into older age.
So the ability to lunge allows us to step into things like a garden bed or to prune some weeds, step over that puddle of water, and it even gives us the ability to stay upright after we have a stumble.
Because a lunge can be performed in several different directions, it actually challenges our balance and improves our stability in any unilateral movement.
In a Canadian 2009 study targeting forward motion lunge training and balance control, showed that lunges challenge our balance, improve trunk stability and provide the much needed lower limb strength to negate fall trip hazard risks.
So this undervalued active daily life movement becomes really handy when we need to step sideways or backwards or even catch ourselves should we trip and start to fall.
Watch: Lunge Exercises for Beginners | 7 Safe Variations for Women Over 50
ALL Bodyweight
Ready, let's jump deeper into the 'Lunge Exercises for Beginners' lesson:
So, in this post along with the why, you'll learn 7 lunge exercises for beginner you can do at home, and then we'll wrap up with a simple nine-minute at-home workout that keeps you lunging well and pain-free.
WHY Lunging Movement Exercises Matter + Real-Life Implications:
Lunges are like all-terrain tyres for your body. They keep you steady on stairs, in the yard, or when a grandchild runs in for a hug. Now that we have an understanding of where it shows up, let's look at the big picture, because every move (lunge) you do is like a practice run (lunge) for the real world.
You learn how to catch yourself with one strong step forward, backwards, or sideways. This teaches your hips to stay open and your balance to stay on the ground. The examples below show how those practice moves will help you in real life, and why your future self will thank you for doing lunges in your regular workout routines.
So let's dive deeper into "Why" the Lunging movement matters:
1. Staying Upright After a Trip:

Real Life Example: You catch your foot on the door mat and have to shoot one leg forward to stop the tumble. That “save-yourself” step is a forward lunge in disguise
Why It's Important: Practising lunges trains each leg to push, brake and balance on its own, so your body already knows what to do when real life gets wobbly. Fewer falls mean fewer bruises, breaks and scary hospital trips.
A small study on women 65+ found six weeks of forward-lunge practice sharpened balance control and made recover-a-stumble reactions quicker
2. Climbing Stairs Without Puffing & Descending Safely:

Real Life Example: Picture walking the grandkids up the lookout steps, then coming back down with an armful of picnic gear. Going up needs leg power and breath; coming down needs brake-control so you don’t wobble or jolt your knees.
Why It's Important: Practising lunges fires up your quads, glutes and hip muscles; the same set of muscles that lifts you on each step and lowers you gently on the way down. Stronger legs mean you climb with ease and descend with confidence instead of gripping the rail for dear life.
A 6-month resistance-training study in adults 60-83 boosted stair-climbing speed and leg strength by double-digit percentages.
On the descent, a 16-week lower-limb program (loaded with lunge-type moves) improved joint control and balance during stair descent, making each step down safer for older adults.
3. Getting Up From Floor Holding Baby/Toddler:
Real Life Example: You lunge forward to lift a wriggly toddler from the floor or slide a heavy grocery bag onto the bench.
Why It's Important: The split-stance keeps your back tall while one leg takes the load, protecting knees and spine. Training lunges also fixes right-left strength imbalances, so you’re solid whether you lift with the right or left hand.
A motion-analysis study tracked how adults 65+ get up from the floor and highlighted the hip- and knee-flexion demands of the most common techniques, such as a half kneel split stance loaded lunge.
4. Reaching into Garden Beds or Car Boots:

Real Life Example: Stepping sideways into a raised veggie patch or diagonally into the boot to grab a suitcase uses a side or 45° lunge.
Why It's Important: Practising lunges in different directions teaches hips and core to stay steady no matter where you have to step. That keeps you mobile for hobbies you love and reduces twisting injuries.
In a 2024 Indian study participants 65+ practised forward, sideways and diagonal stepping patterns. After 4 weeks the stepping group beat the conventional-exercise group on two gold-standard balance tests and cut their fear-of-fall score. Concluding that multidirectional stepping exercises is a “more effective” way to boost lateral stability for most daily life activities.
5. Protecting Bones and Joints:

Real Life Example: Each time you sink and rise in a lunge, your thigh bone presses firmly into the hip socket, telling your body, “Keep this bone strong!”
Why It's Important: That single-leg load helps slow bone loss at the femoral neck (a common fracture spot after menopause) and strengthens supportive muscles around the knees. Strong bones and joints keep adventures going long after 60.
This study review analysed 17 randomised trials and found that resistance training (including single-leg moves like lunges and step-ups) produced a significant gain in femoral-neck bone density for women after menopause.
#1: How To LUNGE Properly: A Beginners Perspective
So some of the rules when we're doing a lunge is stay upright.


- So we need to keep that chest upright. We're not going to lean right into that knee. We're going to stay back. So both legs, when we actually are in a lunge, both knees will bend and we are going down
- So as we lunge, this heel is up at the back so that both of our knees can bend. If that heel stays down, then it's a bit harder
- Too many of my clients I see as they step out or step back to lunge, they actually lean forward. We need to keep that chest upright. So don't lean forward. That's putting the center of gravity in the wrong place. So we're trying not to lean right forward into that front leg


- Now if you're somebody with not good balance, this is what I see all the time with a lunge. I see this back foot out to the side at a diagonal. Now there's no way you can do a good lunge like that because one knee will go that way. You can see how awkward that looks, and then the other knee will come forward. So many people with not good balance, I suggest they go hold onto a wall or hold onto a broomstick so that both these knees can aim the same way
- So you always want those knees in alignment. Whether we do a step out lunge, these knees will always follow, track towards our toes. So whichever way we go, the knees will track towards the toes. You always want that front foot straight in a lunge
- You may have this other leg, the one that we're stepping out onto, don't let the knee rotate inward or outward
- Don't let the knees cave inward like people who have a lot of instability through their hips, or with balance
#2: Beginner Static LUNGE:
So our first lunge is simply a static lunge. Now you may want to hold onto a wall with this.


- I'm taking one leg to the back, one leg front. You can also hold onto weights with this if you did want to. My heel is up at the back. And if you see me from the front, I can step out to the side a little way. I don't need to be directly behind the other leg, particularly if you're somebody that doesn't have good balance, feel free to take that leg slightly out to the side
- And then as we come down and up, we're simply going to bend both knees.
- So if you need to hold onto the wall, hold onto the wall, the same, my heel is up at the back, my chest is staying up, and my knees are aiming towards the front. So again, feel free to hold onto a wall, hold onto a chair, whatever it is that makes you more stable
- I'm not trying to lean forward.
#3: Beginner Forward LUNGE:
Now, we are going to do a lunge with our next one.


- So from stand
- Simply step out keeping knees aligned with toes, both knees bent
- And then return to standing


- So when we step out we put the weight into this front leg. But I can feel my weight, 80% of my weight into this front leg. And as a result, I can feel that right through that leg and into my glutes as well, my bottom muscles. So as I step out, again, you want those knees to stay straight, stay stable.
- So I'm not trying to lean back
- Not trying to lean forward, just keeping that chest up.
#4: Beginner Reverse LUNGE:
Now, for many of my clients who don't have good knees, we, I often will take people for back lunges.
Back lunges are a far kind of way to deal with knees because we don't have that amount of emphasis on that knee as we step forward. So I find that people who don't have good knees are often better doing a step back lunge. So rather than stepping forward, we step back.


- The same rules apply trying to keep that chest up
- We still got the weight into this front leg. So there's no change there
- Still trying not to have the knees caving in. So we're taking a step back and bringing it up. So this seems to be kinder on already painful legs and joints. And I also find that people can stay into a better lunge position when they step back
- Now you may say that, oh, do I need to take my knee down near the floor? No, you don't. Take your knee down wherever you feel that you can. Not everyone's knee will allow them to go as low to the floor as that. So just wherever you can, obviously build up to that point. We can go a bit lower to the floor so that you are able to bring that further down. But you may not start that way, particularly if your knee's not good
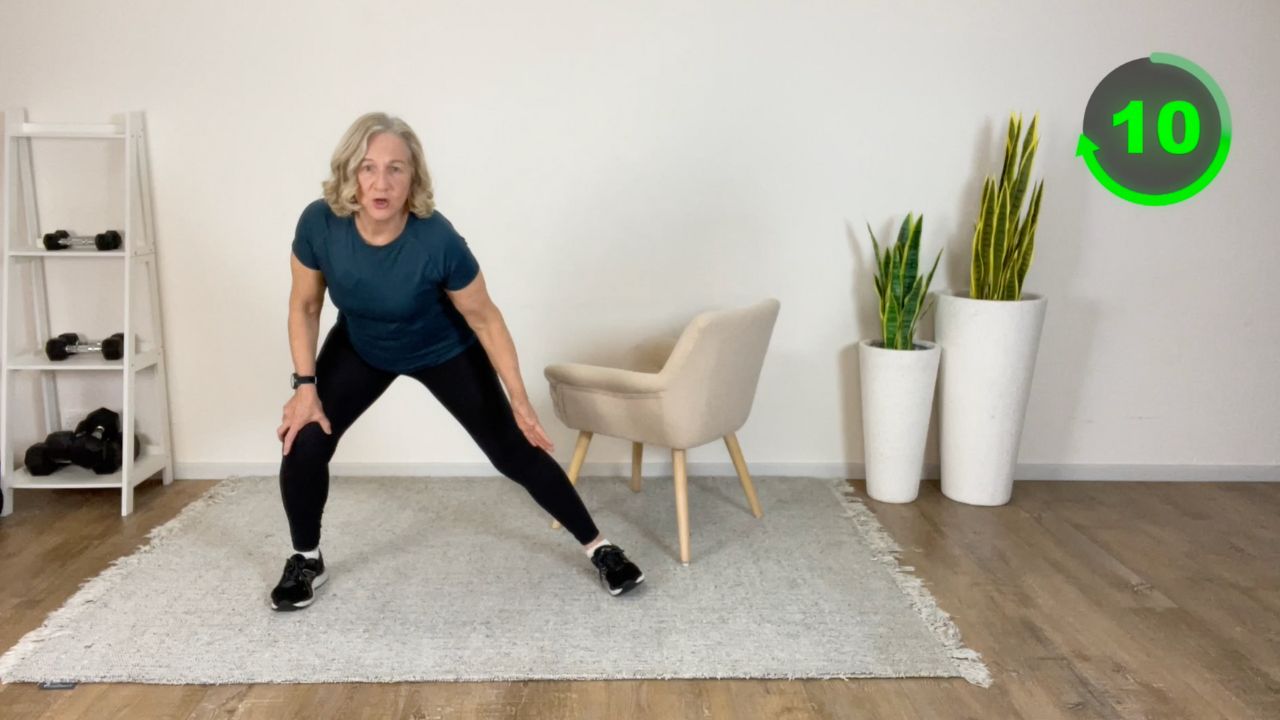
#5: Beginner Side LUNGE:
Now we're going to look at a side lunge.


- To a side lunge, we will be stepping out.
- Now our main weight here is into this leg that we step out in. Both feet are going to face the front
- And this leg is staying nice and stable and straight.
So as I step out, straight out to the side, I'm not trying to step kind of to the front or to the back with this one.


- I'm just trying to sit nicely into this leg so I can feel the load going into that leg. But both toes, that toe can go slightly to the side, but really to the front and both feet face forward. And this leg is staying straight.
- You don't want to let this leg cave in or let that foot roll because that's a whole lot of instability on that knee. So keeping that leg straight, placing my weight into that side
So again, if I have people with weights here, I might have one either side of that leg as we step out, but we want both feet to the front.
- Making sure I don't slump down and I'm not trying to
- It can be a little bit of a lean as we come to the side, but again, we're keeping our back nice and straight and everything strong.
I recommend if you really don't have good knees and this side lunge is bothering you, just start in a smaller side lunge. We all need to be working with what we can do. And so you may just start with a smaller side lunge and then build up to it and build up to it and build up to it till you can get into a bigger lunge.
#6: Beginner 45° Diagonal LUNGE:
And then we have our 45 degree lunge.


- So this is where we take out our foot
- Kind of not to the front, not totally out to the side, but for 45 degree
- We keep our hips to the front
- So we're looking to the front, we're not looking to the side


- Our hips maintain the front a front facing position
- And then we're still going to put that weight into this front leg here, this leg that's on the 45 degree angle, but we're staying straight to the front. So my eyes are to the front and I can feel that leg just works a slightly different way when we're at that 45 degree angle and then a 45 degree angle here
- And you don't know, one day you may just trip over something and you're stepping in that 45 degree angle, but you're so used to doing it that you don't actually fall down. You just stumble, but you don't fall, which is where we always want to be not actually falling down
- And of course we can take that 45 degree one out to the back as well. So again, that heel is up at the back and I'm letting myself come down with that still keeping those hips to the front, and then I'm taking it to the other side
So many people say to me, I can't do lunges because of my knees. So then again, just going back to, I would be starting in a back lunge and lots of support. So have a wall beside you, have a broomstick beside you, but lots of support there.
#7: Beginner Walking LUNGES:
Now we can also take this lunge into a walking lunge.


- So from here
- I'm then taking a big step out, my heels up at the back, my knees are facing forward, my chest is up
- and then I can bring that foot up, then take out the other foot, bring it up, take it out


- Or if you can make that where we're just taking a step
- And then the other one comes straight into the lunge,
- Straight into the lunge
- Straight into the lunge. And of course, we can lunge backwards as well


- We can also do a lunge walk with a bit of a twist
- Then we're using that core a bit more
- And we can bring a weight around to that front leg side
- That weight could be a weighted ball, it could be a kettlebell, could be a dumbbell, but from here you're going to still make sure everything's nice and stable as we reach that weight around to that front leg


- And the other thing we can do with the lunge is we can lunge to the side
- And take this back in a curtsy,
- So we're stepping out to the side
- And bringing that leg straight back behind, so that takes it into a bit of a curtsy, just really working this leg here in front is doing quite a bit of work, but this leg also as I step out, and then this leg as I step back.
#8: Beginner Elevated Leg LUNGE:
And there is one lunge we won't go into in great detail here. I find that it's quite a hard one to get into, but it's where we go into an elevated leg up.


- So you have your leg on a higher, higher kind of, don't want to be going too far out there
- But we want to be just coming down and up
- So wherever you feel comfortable, you may again need to have a wall beside you or a broomstick and a mop stick, but we're just going, whoops, down and up
And if you're anything like me, you'll feel your glutes doing quite a bit of work as well. So you aim to keep that chest up.
- Again, try not to lean into it. Again, as we go down and up, you're aiming to keep these knees straight and not allowing them to cave in
I hope that's given you some idea of the different types of lunges.
Workout: 9-Minute Beginner Repeatable Routine
Click to play
Now, enjoy these lunging exercises that Coach Sheree has put together into a 9 minute workout.
For a WARM-UP do some on the spot marching, with arms moving/swinging for 2-3 minutes before you start the workout. The warn-up intent is to simply get the blood flowing across your body and muscles.
This lunging movement workout has been designed for those who struggle with everyday getting down and up from floor, walking stairs, and general walking on uneven/unstable ground, and know they need to gain the strength and mobility to the gain freedom, independence and safety they desire.
Workout timestamps:
Timer 30 seconds workout, and 10 seconds rest between.
Equipment Needed: None, All Bodyweight
14:04 - Static Lunge (chair/wall assisted if needed)
15:24 - Side Lunge (Both Sides)
16:44 - Forward Lunge (chair/wall assisted if needed)
18:04 - Reverse Lunge (chair/wall assisted if needed)
19:24 - Forward Lunge with Pulses (chair/wall assisted if needed)
20:24 - Side Lunge to Curtsy (Both Sides)
22:04 - Around the World Lunge (Front, 45°, Side, 45°, Back) Both Sides
Wrap Up & Final Advice:
Ladies, here’s the big picture: lunging isn’t just an exercise, it’s a life skill. It helps you get strong on each leg, stay balanced when the world gets wobbly, and move with confidence in every direction life throws at you.
Whether you're stepping over into the garden bed, bending down to scoop up a wriggly toddler, or catching yourself after a trip, your lunge is right there, showing up when it matters most. That’s why we don’t train for perfection, we train for real life.
And don’t worry if it feels awkward at first. Start with the version that works for your knees, your balance, your body today. Use a wall, hold a chair, take it small, just don’t stop showing up. Because every rep is building your strength, your, stability, and your belief that you can do hard things.
So let’s keep lunging strong, forward, backward, sideways, diagonally, because this isn’t just about fitness. It’s about freedom. And you, strong woman, are absolutely worth it.
Sources & Additional Reading:
- Effects of Forward Lunge Training on Balance Control in Elderly Women
https://core.ac.uk/download/pdf/72778475.pdf - Weighted Stair Climbing in Mobility Limited Older People: A Pilot Study
https://site.ironwearfitness.com/images/wtstrclimb.pdf - Combined Resistance and Stretching Exercise Training Benefits Stair Descent Biomechanics in Older Adults
https://www.frontiersin.org/journals/physiology/articles/10.3389/fphys.2019.00873/full - The Biomechanics of Healthy Older Adults Rising from the Floor Independently
https://www.mdpi.com/1660-4601/20/4/3507 - Effectiveness of Multidirectional Stepping Training on Balance among Geriatric Population
https://pdfs.semanticscholar.org/ca5a/3014ae08ef73d12d27e6e4b1e9db7b8bd205.pdf - Optimal resistance training parameters for improving bone mineral density in postmenopausal women: a systematic review and meta-analysis
https://josr-online.biomedcentral.com/articles/10.1186/s13018-025-05890-1

